Video Configuration
Here's a description of some basic video customization features on the MiSTer. You can change your resolution, modify the framebuffer to reduce input latency and video stuttering, add some video filters, use shadowmasks, and even gamma correction. Also, you can use 5x overscan mode to push a 1200p image into 1080p for square pixels and nearly the original overscan of a CRT, depending on the game's resolution. There are lots of options to play with, here's some basic ones.
Video Presets
Video Presets were added so you can easily load a good-looking preset that will work in most situations. This is a great way to get started. They are easy to use, just open the OSD, press right, then go to video processing, and then "Load Preset". Select the one you want and see if it looks good to you. Here's an example video showing you how easy it is:
MiSTer Ini Video Settings
In the MiSTer.ini file there are many video setttings to try. We'll just focus on a couple here for now and you can dive deeper into things like CRT usage in the Advanced - CRT section.
First, you can edit the settings in the MiSTer.ini file with windows Notepad, Visual Studio Code, Notepad++. Pretty much any text editor will be fine. Alternatively you can run the ini-settings.sh script in the scripts folder, this has a simple interface to change options.
video_mode
A bit of a ways down the .ini file there is a video_mode option. Above it the resolutions are commented:
; 0 - 1280x720@60
; 1 - 1024x768@60
; 2 - 720x480@60
; 3 - 720x576@50
; 4 - 1280x1024@60
; 5 - 800x600@60
; 6 - 640x480@60
; 7 - 1280x720@50
; 8 - 1920x1080@60
; 9 - 1920x1080@50
;10 - 1366x768@60
;11 - 1024x600@60
;12 - 1920x1440@60
;13 - 2048x1536@60
;14 - 2560x1440@60 (Pixel Repetition)
This tells you that video_mode=0 will set you to 1280x720 resolution at 60hz. For most people they will probably want to use 1920x1080 resolution at 60hz, so my advice would be to change this to video_mode=8. You can also use the ini-settings.sh script, it will tell you what option selects which resolution, so just select the right one for your display.
There is a detailed explanation of video modes available in Advanced - Video Modes thanks to Wickerwaka.
vsync_adjust
Another important option is vsync_adjust. Most modern displays work fine at 60hz, but some games run at 60.6 hz (like Donkey Kong for the arcades) which is a "non-standard refresh rate". Therefore, MiSTer has what is called a "framebuffer". The game is still running at 60.6hz but the frames are sent at 60hz. So occasionally there is a little "stutter" on the screen to make up for the frames going too fast and being adjusted. To use a framebuffer adds a minimal amount of lag. Here's a list of the options and what they do.
Generally speaking, the rule of thumb is that if you want the smoothest video output and lowest lag then start at vsync_adjust=2 and if a core doesn't work that you want to play on reduce it to 1 or 0 to see if the compatibility is resolved. Your results may vary depending on the display you are connected to and what core you are using.
Variable Refresh Rate (VRR)
MiSTer FPGA now supports Variable Refresh Rate (VRR). The advantage of using Variable Refresh Rate is a reduction in sync loss on your display when the core is outputting non-standard refresh rates and you are using a low-lag vsync_adjust setting such as 1 or 2.
You will need a recent build of the Main MiSTer binary which supports VRR (a new release is currently pending, see the #unstable-nightlies channel in the MiSTer FPGA discord for early builds. You will also need either an updated version of the MiSTer.ini or if you prefer to use your old MiSTer.ini file you can add the following lines to your current ini:
; Variable Refresh Rate control
; 0 - Do not enable VRR (send no VRR control frames)
; 1 - Auto Detect VRR from display EDID.
; 2 - Force Enable Freesync
; 3 - Force Enable Vesa HDMI Forum VRR
vrr_mode=0
; Freesync min/max framerate parameter defaults to the min/max capability reported by the display
; Freesync minimum framerate.
vrr_min_framerate=0
; Freesync maximum framerate
vrr_max_framerate=0
; VESA VRR base framerate. Normally set to the current video mode's output framerate
vrr_vesa_framerate=0
By default VRR is turned off for broad compatibility purposes in order to keep the MiSTer easy to use. Set vrr_mode= to 1 if you wish to auto-detect what your display supports. This has shown varying results, some displays can't achieve sync with this setting. If your display doesn't sync with vrr_mode= set to 1 (auto) then you can force enable it to either Freesync or VESA HDMI Forum VRR with 2 (Freesync) or 3 (VESA VRR) respectively. On some monitors/tv's Freesync is called "AMD Freesync" but it is open source and not exclusive to AMD products. Likewise on some monitors/tv's VESA VRR is called "GSync" even though it is not necessarily exactly the same as the proprietary standard from NVIDIA.
With VRR your results may vary, make sure you can edit your MiSTer.ini easily before you change this setting as it may render display output useless until you revert the settings. You also may notice that the MiSTer's reported refresh rates and your TV's reported refresh rate isn't matching one another. This is expected, the way these refresh rates are calculated on TV's is proprietary so we have no way of knowing how accurate it is without using expensive testers.
It has been reported that VRR enabled might get measurably smoother video output (Ace noticed that the repeated and skipped frames he saw on his display went away with it enabled). There is no guarantee that the same behavior will occur on your display. It was also observed by multiple testers that it did improve sync stability with some non-standard refresh rates when enabled. Your results may vary.
Core exceptions
There are also ways to add exceptions. My monitor doesn't play nice with the low lag setting on the Genesis core. So in my MiSter.ini, I added the following override/exception to the end of the file for just the MiSTer core:
This makes it so no matter what my vsync_adjust setting is in the upper section, when I use the Genesis core, it will force it to use vsync_adjust=0 (the most compatible mode) every time. You can also add a wildcard to these exceptions so one exception could be applied to multiple cores:
This will make it so every core that starts with dkong will have the same rule applied to it. You can also make an exception for every single arcade core like so:
For a list of the internal core names to use in your exceptions see Developer Reference - Core Names for a complete list.
NOTE - Arcade cores's internal core names are NOT used for the .ini core exceptions, the <setname> value in the MRA file is what is used. e.g. for Arkanoid (Japan).mra:
[arkanoidj] is the ini core exception you would use for this one game. For a lest of the setnames please refer to Developer Reference - MRA Setnames for a complete list. Video Processing Options Tutorial
Here's a tutorial that you can follow along to get you started using the powerful video processing options on MiSTer FPGA.
Filters (and scanlines)
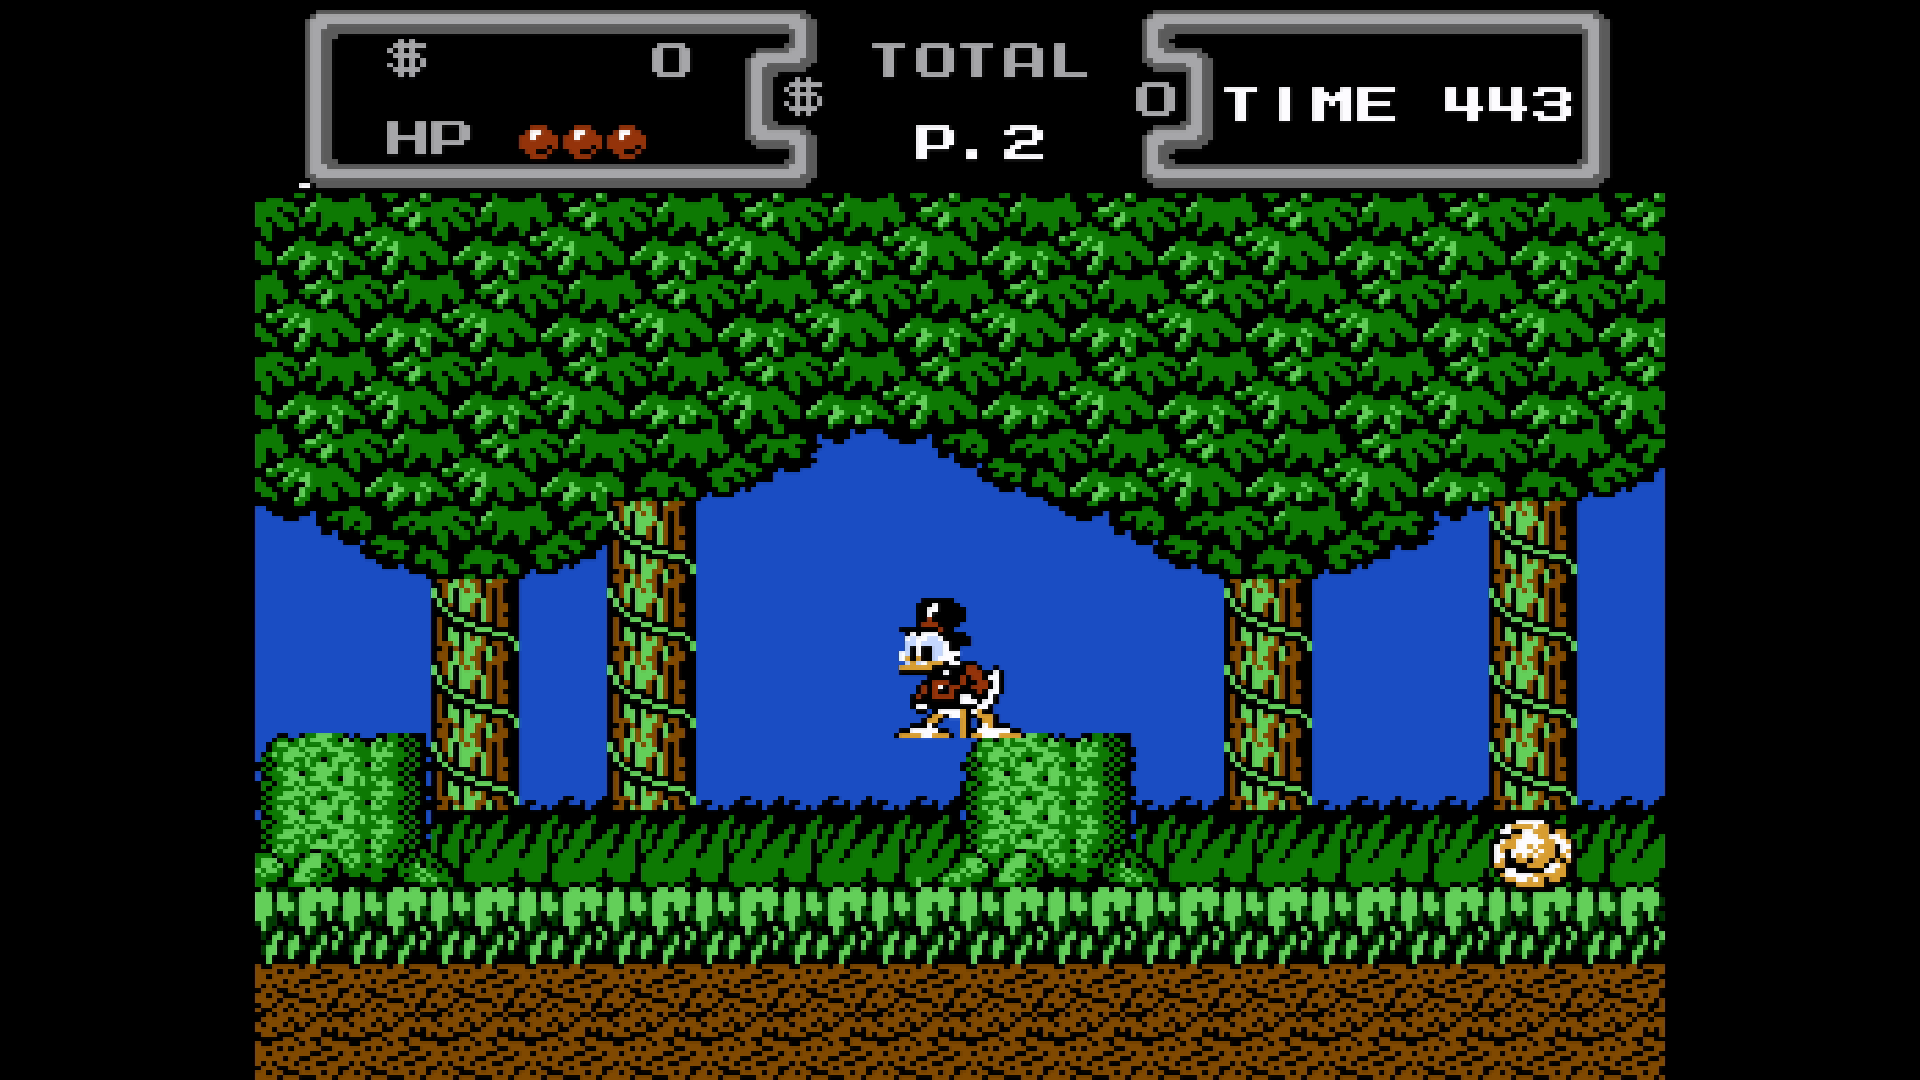
MiSTer has the capability to use upscaling filters and scanlines to help enhance the video output or even make it feel similar to a retro CRT television. If you opened the NES core for the first time after setting the MiSter's video output to 1920x1080p and loaded up Duck Tales, then you should see something like this:
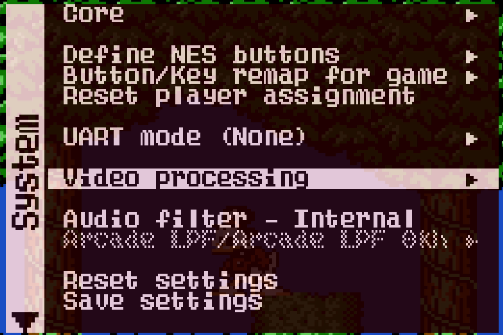
This can be tweaked a little to make it look a lot nicer to our eyes. First let's go into "Video Processing" in the secondary OSD/Menu (press F12 or the menu button you assigned earlier, and then right to see the secondary menu):
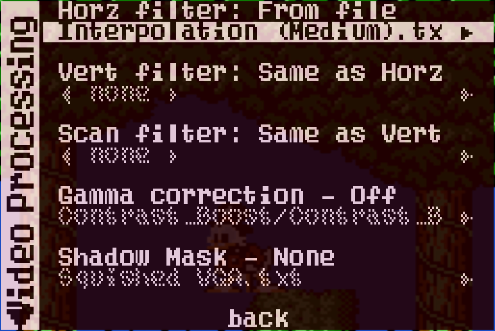
When you select this it will show you a screen with a bunch of options. Don't get overwhelmed, it's fairly simple when you follow this guide, and you will understand how they work. I'll give you some recommended settings for most of the cores at the end of this tutorial which should be your go-to for now while you get used to things.
By default "Video Filter:" is set to "NearNeighbour". This is a nearest neighbour filter. Basically, to turn 240p video into 1080p video requires these pixels to be made larger. Since 240 doesn't divide evenly into 1080 (1080 / 240 = 4.5), then some of these pixels won't be perfectly square. Nearest neighbour helps fool your eyes into making them seem more square than they actually are. It's filtering the video before it reaches your eyes to make it look better!
Select Video filter to change it so you can select a filters file. You will notice the text changes from Video Filter: to Horz filter:. Don't worry about this too much, for any normal rotation games, Horz is for your upscaling filters that soften or sharpen the image.
Select the <none> below to browse. It should show you quite a few options. For now select Interpolation (Medium).txt. This is a filter which gives you some softer edges while still maintaining an illusion of square pixels.
There we go, those pixels are a bit smoother now:
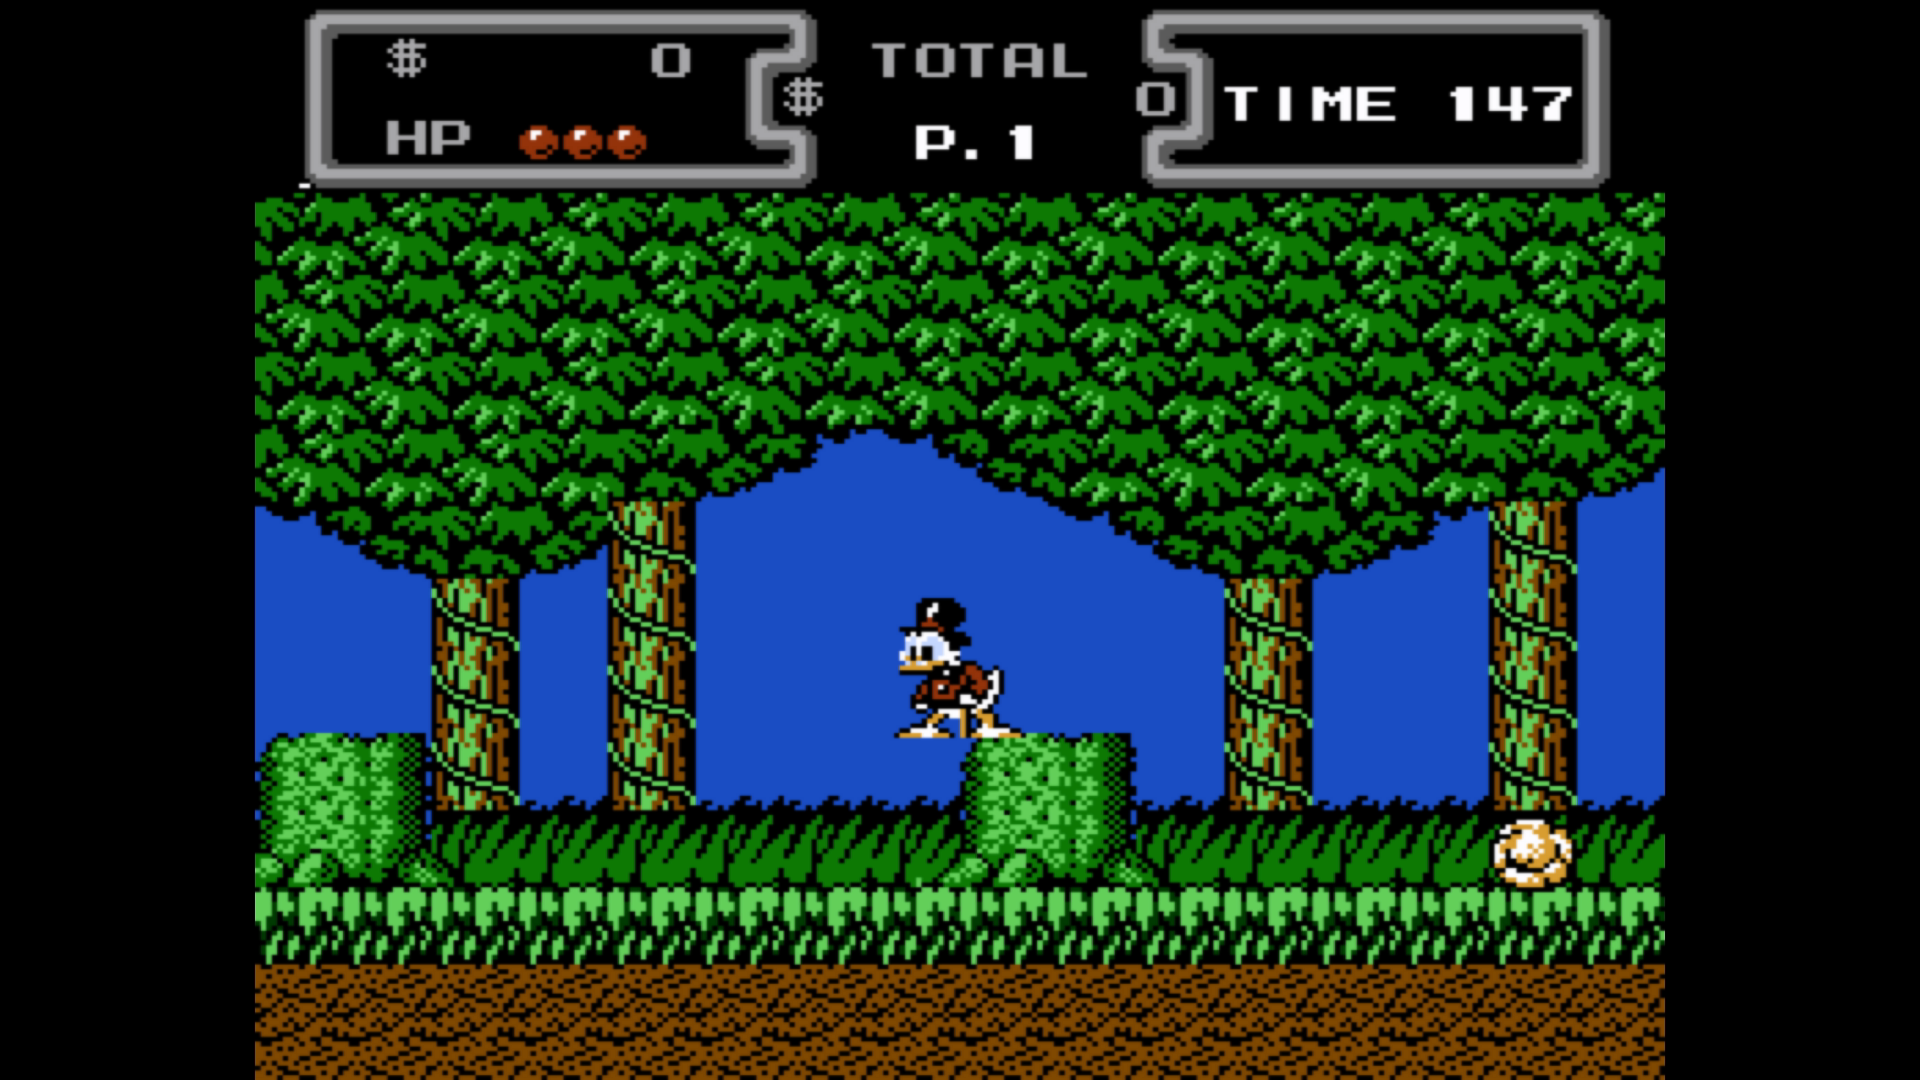
Another added benefit to interpolation is the scrolling looks smoother to the eye when compared to sharper filters like the default Nearest Neighbour setting.
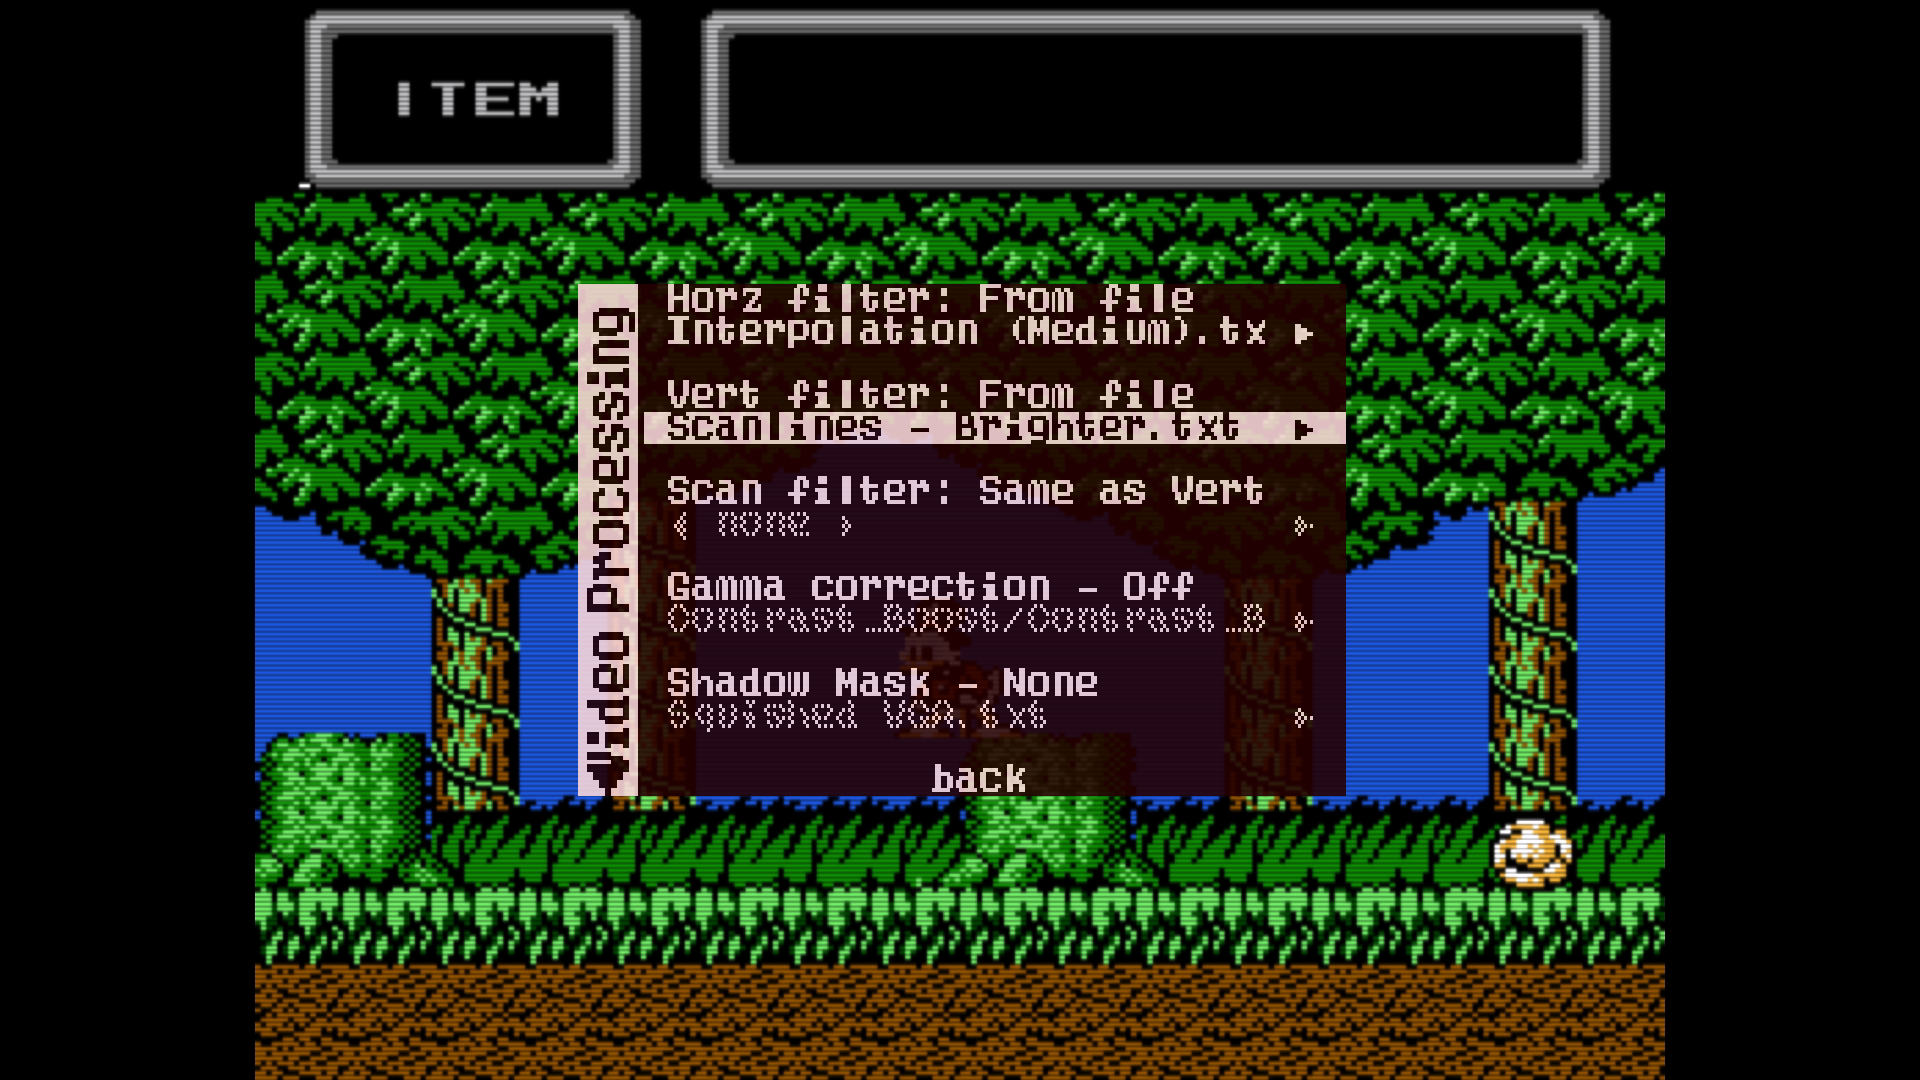
Now let's say you want some scanlines, sorta like what CRT's had and some emulators have an option for. Well to do that, we just need to setup the Vert Filter: option like we did the horz filter. You see, we will be filtering horizontal lines from top to bottom (vertically) on the video output. Inside Vert Filter's From File option, select Scanlines - Brighter.txt. You should see something like this as your options:
5x Vertical Crop (1080p only)
Note: this feature only works if your output resolution in your MiSTer.ini is set to a 1080p option!!
If you have been following along on your MiSTer, you might notice that the scanlines look darker occasionally. This is because 240p (this game's resolution) doesn't divide equally into 1080p (your resolution on your MiSTer). But 240 does divide into 1200 equally, 5 times 240 equals 1200. So to fix these scanlines looking uneven, we can stretch the image vertically to make all the pixels perfectly square. Go back into the regular core menu and select Video & Audio. There is an option called Vertical Crop. Not all cores have this, but the NES core does happen to, so it's a good example. Go ahead and select the Vertical Crop option to change Disabled to (216p)5X.
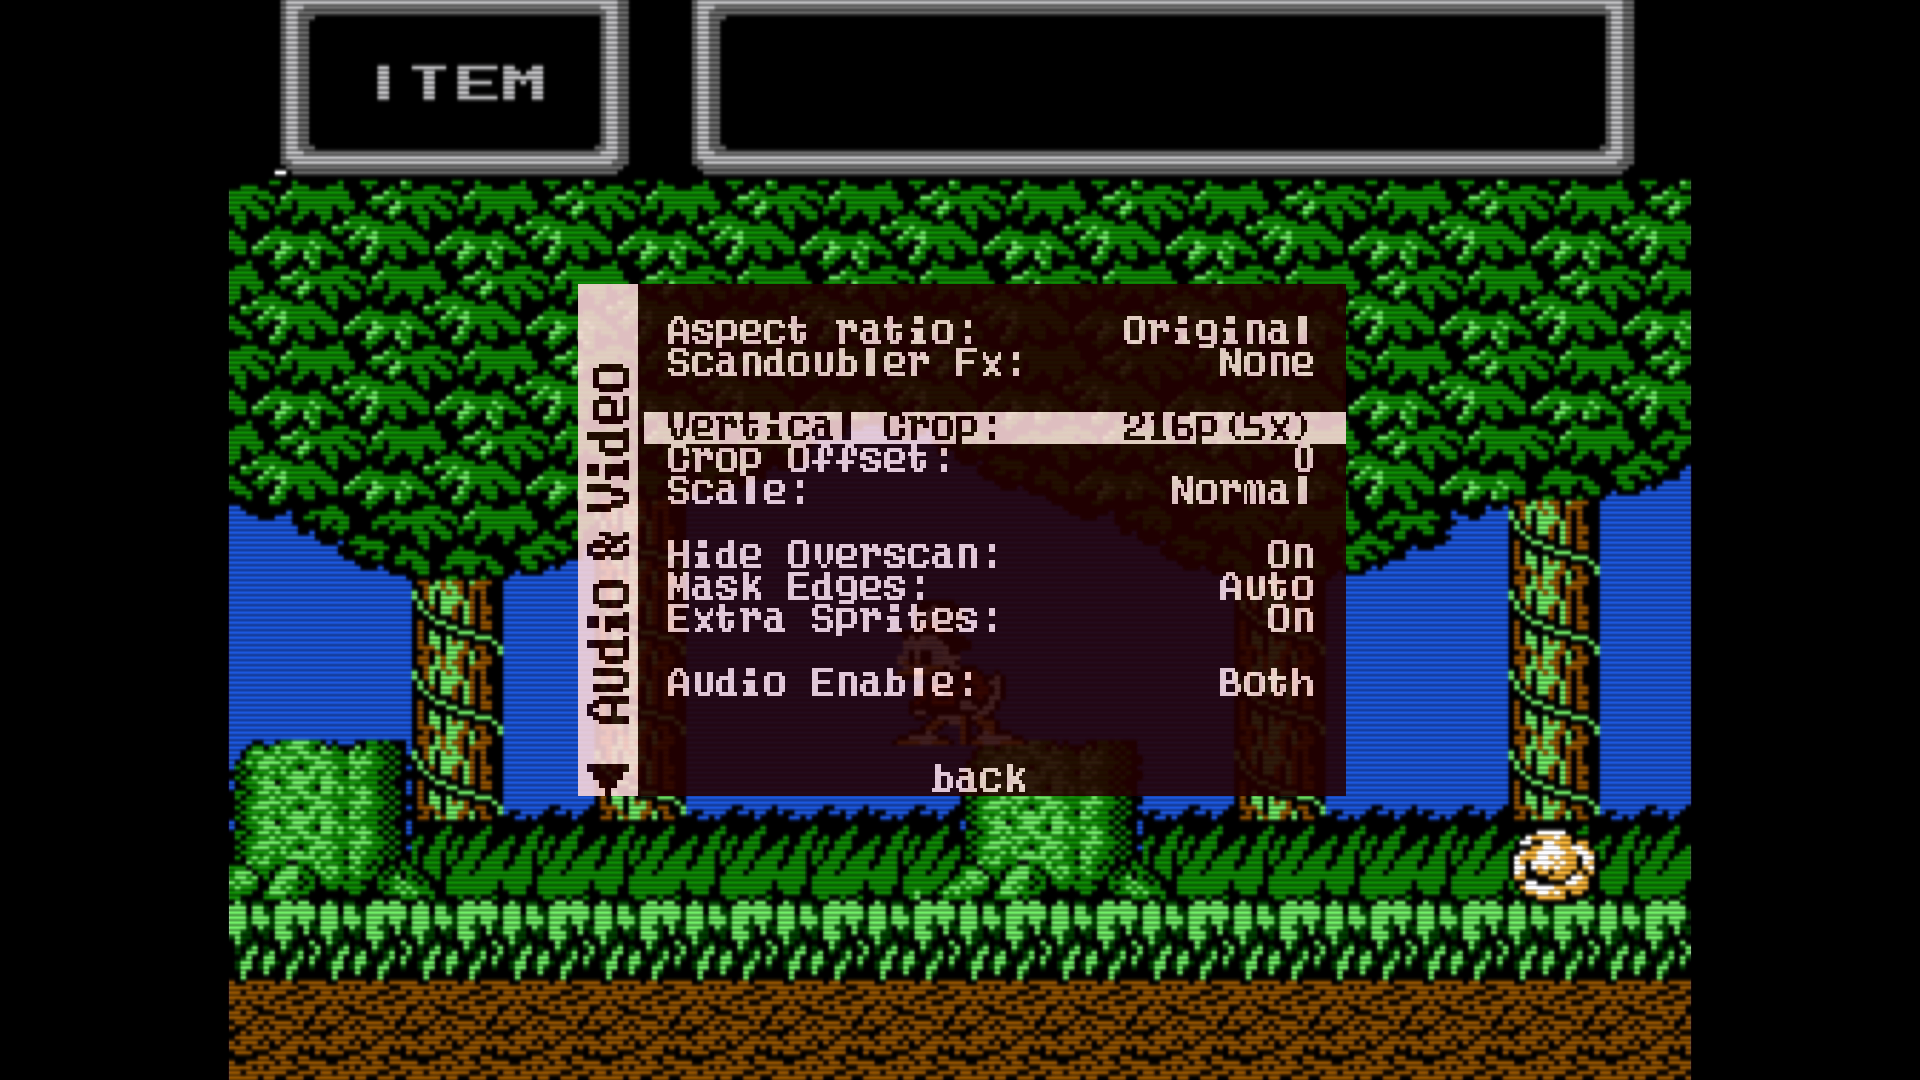
You will see just a few lines off the top and bottom get cut off. This is okay, original CRT's cut off about the same amount from the top and bottom anyways. Most games don't have information missing at the edge of the top and bottom.
Now your vert filter: scanlines - brighter.txt option should have evenly spaced scanlines vertically, and the image will look a lot better.
Shadowmasks
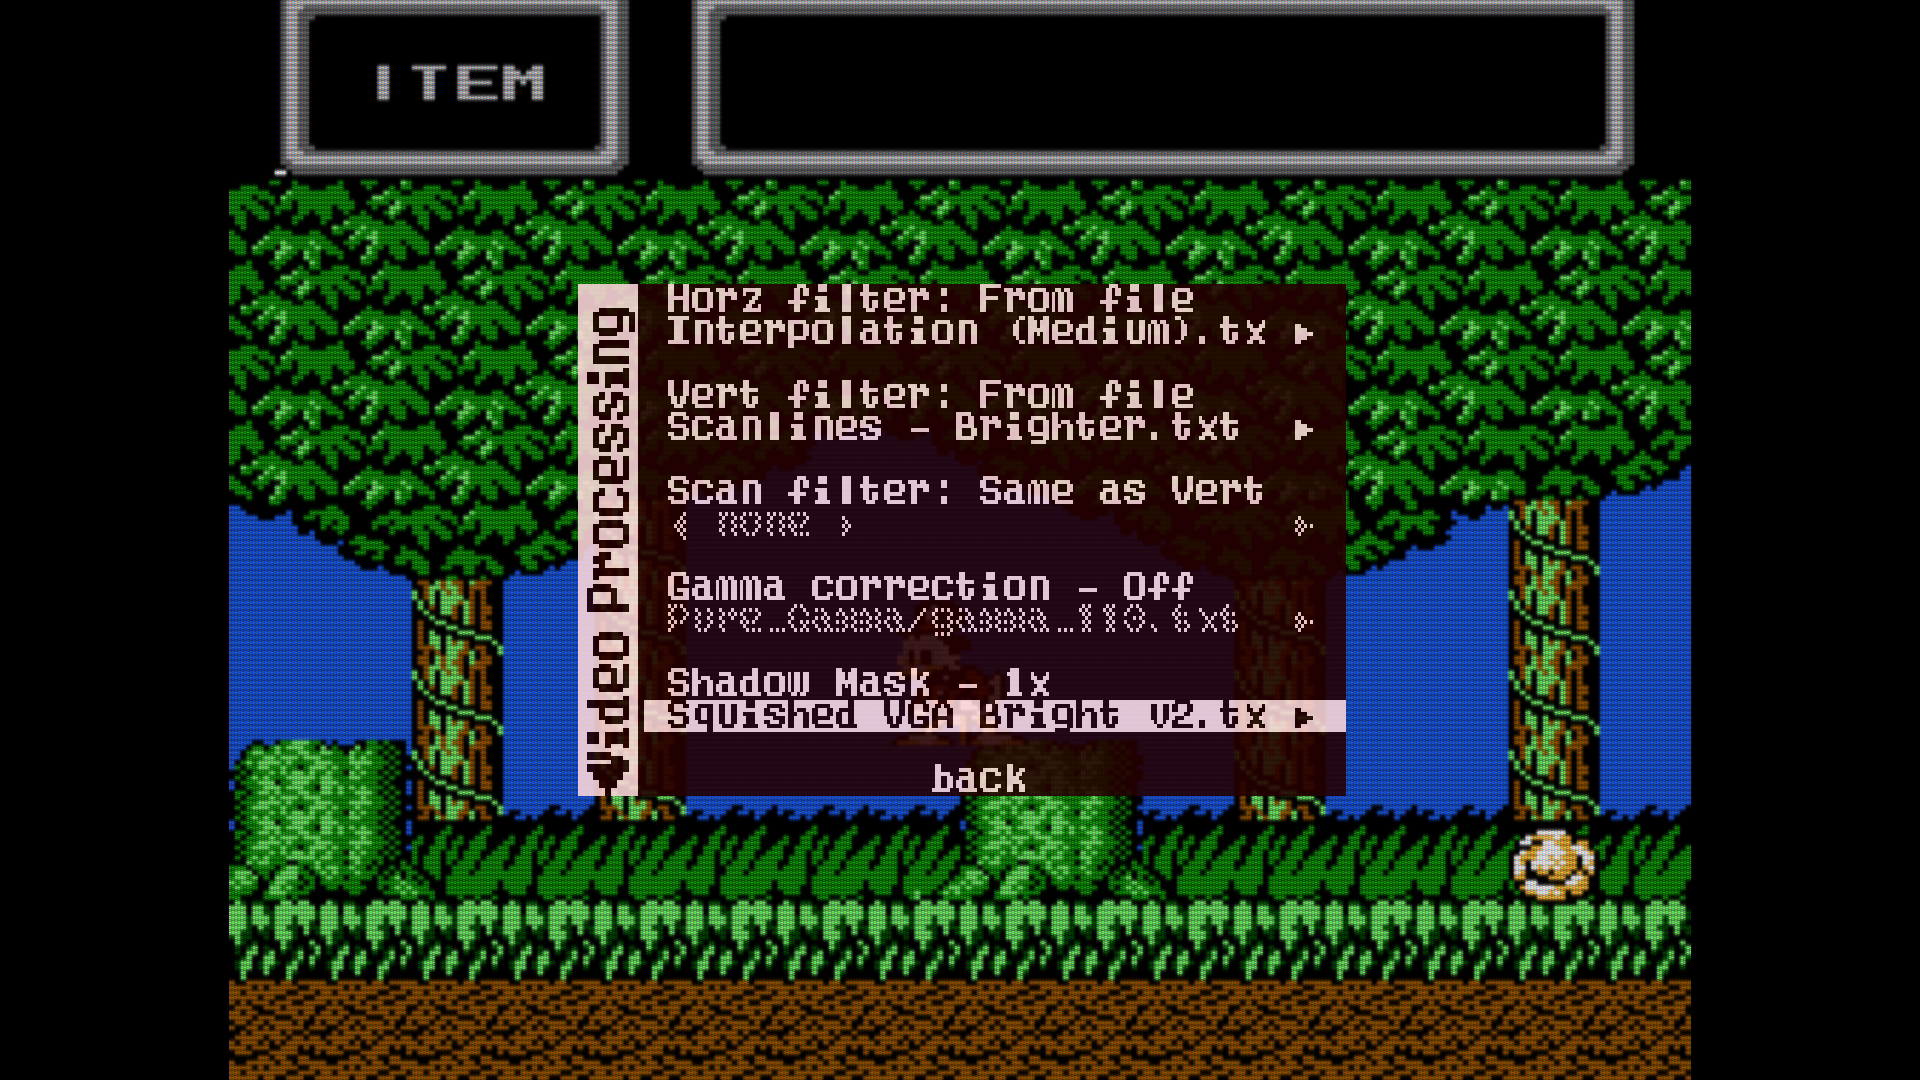
MiSTer FPGA also has another layer options available to use called Shadowmasks. Shadow Masks are able to modify the red, green, blue color channels to create advanced effects, such as simulating the appearance of the grille or mask on an old CRT screen or the pixel layouts of old LCD handheld consoles. There are lots of options, but we are just going to use personally one of the most versatile color shadowmasks for this tutorial, Squished VGA Bright v2.txt. This shadowmask attempts to resemble consumer computer monitors and some tv's which had red, green, and blue phosphors in a particular pattern. Here is a picture of the options after I've added this Shadowmask to the same game's video processing menu:
Gamma Curves
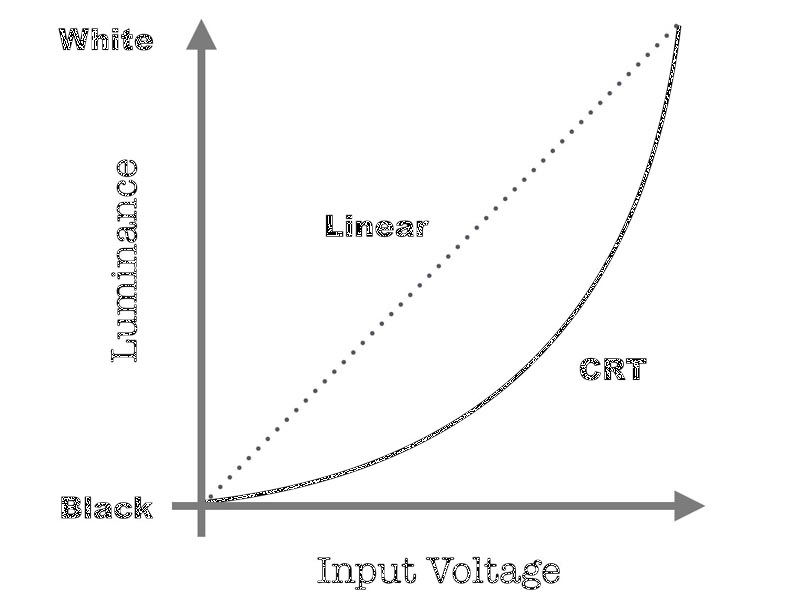
Gamma is a bit of a tricky thing to explain. Basically, gamma on an old CRT is the relationship between voltage and brightness. Think of a graph, the x-axis is voltage and the y-axis is the "brightness" (more accurately called luminance). Modern televisions are (ideally) a totally straight line. Old CRT's have a curve. At medium voltage and brightness it is a lot less brightness than you'd expect. Sorta like this:
Now given that the MiSTer is outputting the linear example, the Gamma filters can restore a similar Gamma curve as you may have been used to with your old television. This is especially helpful because we have just applied a "brighter" scanline and a shadowmask (which added a mask of colors across the screen imitating a CRT's phosphors). If you've been following along with this tutorial so far, we're gonna play with Gamma just to see how it looks to your eyes. This is all personal preference. If it looks good to you, great. If someone else doesn't like it, well... tough! :)
I will apply a very mild "Gamma Curve" called gamma_113.txt which is located in the Pure_Gamma folder when you select the gamma options. This gamma curve is allegedly supposed to get you close to a typical consumer CRT's gamma curve.

Video demonstrations
Some video demonstrations: