FAQ
Here are some Frequently Asked Questions that you may have. If there is anything missing here, feel free to contribute by editing the page on github using the Edit pen icon in the top right.
When will MiSTer support cartridges or USB CD Drives?
MiSTer will never officially use physical cartridges or support USB CD Drives.
The project aims to replace the need for having original hardware for the same experience. It is physically impractical to support cartridges given the number of GPIO pins available from the FPGA. USB CD Drives all will have different latency and buffer characteristics, different drivers, and actually will add unpredictable latency to the current method of loading CD games.
Why doesn't MiSTer have a fancy GUI with cover art and metadata?
There are a few reasons combined to explain not having a big fancy GUI on MiSTer. First, MiSTer's menu is designed to take up a very limited amount of space on the FPGA and use the least amount of resources on the ARM processor side. Second, the DE10-Nano has no graphics processor, so a fancy GUI will be rendered slowly in software by the CPU unless it is rendered on the FPGA side. Finally, the MiSTer menu has to fit on a wide variety of very low resolution analog displays and still be useful.
Does MiSTer have lag?
It depends on your setup, but it ranges from imperceptibly low to around one frame of lag.
Zero latency is possible with certain equipment and tweaks. See here for a more detailed explanation.
I've seen in the news, "Update Framework" or "Update Sys". What does that mean?
The "framework" (or "sys") has all the common elements between cores that handle things like IO, video scaling, etc... Therefore this means that core had it's framework elements updated.
Can I customize the update/downloader script to ignore certain things?
Yes, you would just need to add some filters to /media/fat/downloader.ini. Read this guide for more information.
Can I use the downloader script to download more cores than it currently does?
Yes, there is support for custom databases in the downloader script. Read this guide for more information.
What are unstable cores? How do I install one?
Unstable cores are automatically built from the latest commits to a core's repository. They reflect the most recent changes made by developers and are updated continuously as new code is pushed. While they may contain bugs or unfinished features, they will eventually mature into a stable release. Unstable cores are intentionally not installed by update scripts, but there are valid use cases for installing one, such as testing bug fixes or new features. Note that not every core has automated unstable builds available.
Unstable builds are uploaded to the MiSTer-unstable-nightlies GitHub organization, which hosts forks of core repositories. The downloads can be found under the Releases tab of the core's repository (not to be confused with the releases folder visible in the repository file tree, which contains the stable upstream builds and should be ignored). To install the build, copy the .rbf file to the appropriate folder on your MiSTer's micro SD card. You may want to place it in a dedicated /_Unstable/ folder to keep these builds separate from stable cores.
Can I use original console controllers?
Yes, there are many USB adapters for original console controllers available, see the usb controller recommendations below. They can also be connected directly via the IO board's User port (SNAC) as detailed below.
What about light guns?
Light guns such as the NES Zapper are too timing sensitive to work over USB, but will work fine on supported cores via the IO board as detailed below.
MiSTer supports several USB light guns, such as GunCon2, GunCon3, Gun4IR, Sinden, etc.
GunCon2 requires a CRT and a way to tap into the sync signal. GunCon3, and Gun4IR work on all displays. Sinden requires a modern display and dedicated files for MiSTer.
Reflex Adapt supports overclocked GunCon1, with better performance than GunCon2, when 1ms (1000Hz) polling is enabled.
Each core requires calibration. Calibrate your guns from the distance you plan to play. For best results, use a white screen to calibrate.
Never allow the calibration value to be less than 0. If you save a calibration with a negative value, it will likely cause the core to crash. To fix this, remove the core's light gun calibration file from the "config" folder of your MiSTer's micro SD card.
Any USB controller recommendations?
Almost any controller that uses USB will work with MiSTer. You can also use a Bluetooth or 2.4ghz USB adapter for wireless. Good controllers that many users seem to like and have low input latency are:
- Sony DualSense (PS5 Controller) - Very low lag, fast pairing, and a touchpad that can be used as mouse input (for cores with mouse support, like SNES lightgun use or a mouse as a spinner control).
- 8BitDo M30 Bluetooth and 8BitDoM30 2.4G - Note these kinds of controllers do not have as many buttons as the Playstation style controllers, and they do not have joysticks, so you may be limited if you solely use them.
- 8bitDo SN30 Pro 2 - Versatile connectivity and confortable design that is similar to the Playstation DualShock form factor with an SNES aesthetic and button layout.
- 8bitDo Arcade Stick - Wired and wireless low lag functionality with somewhat low variable lag, DIY customizable pushbuttons and joystick is also supported.
- iBuffalo SNES Controller - A little overpriced now, but it is one of the lowest lag controllers tested.
And many many more. Check MiSTerAddons' input latency tests to help you decide. Also to ensure you get the fastest response make sure to check the USB overclock instructions section out.
There are also some excellent usb controller adapters which enable you to use original console controllers:
- UltimateMiSTer.com's Daemon USB Adapters (Portugal) - Support for multiple kinds of controllers using an RP2040 chip and the GP2040 firmware.
- MiSTerAddons.com's Reflex Adapt (USA) - Supports multiple controller types with one primary device to use with multiple controller adapter cables.
- Timville Triple Controller Daemonbite (USA) - A spinoff of MickGuyver's Daemonbite adapters that has support for NES, Genesis, and SNES original hardware. You can also make it yourself using instructions found here. There is an option to purchase a 3d printed housing that you can also print yourself using the 3d files from here.
- 2600-daptor D9
Can I increase the polling rate of my USB controller to improve input latency?
Yes, you can. See here.
Do I need the official USB Hub Add-On Board?
No, but you will probably want some sort of inexpensive OTG hub (such as the MakerSpot Micro USB OTG Hub at least (or a regular hub with an adapter). Use a powered hub if you have many devices.
Do I need to have a USB keyboard with me to use MiSTer?
Yes, it's a good idea to always have a USB keyboard available. Cheap wireless compact keyboards exist that you can use to reduce clutter.
How do I add a second controller to MiSTer?
First setup the controller in the main menu after plugging it in with no core loaded. Then you can define it in the various cores' OSD menus. This is only necessary if the controller is a different make/model (or has a different VendorID/ProductID) than any other controllers you have already defined. If you have already setup a Dualshock 4 controller, the second Dualshock 4 controller shouldn't need it's inputs to be defined again. Because of this, shared VendorID's and ProductID's between devices that are different may require reconfiguration when switching between them. There isn't any way around this currently. This includes using 8BitDo and Mayflash controller adapters with multiple controllers, as the adapters contain the ID information which is referenced.
Does MiSTer need an IO board?
No. The IO board is optional, but offers features that could be important for some users (3.5mm and optical audio, CRT output, tape audio input, etc...).
What are the methods for connecting controllers to the serial port of the IO add-on board?
SNAC (Serial Native Accessory Converter) is used for direct wiring. Supporting cores (SNES, Genesis, NES, and TG16) allow you to directly connect original controllers. SNAC Adapters can be purchased from various sellers online:
- MiSTerFPGA.co.uk's SNAC adapters (best to use alongside their SNAC extension cable
- UltimateMiSTer.com's SNAC Adapters (best to use alongside their SNAC extension cable
- MiSTerAddons.com's SNAC V1 and SNAC V2 and SNAC V3 which all use external controller adapters made for them purchased separately.
See this page for details on SNAC.
Do I need an IO board to get analog video output to my CRT?
No. You can also use an HDMI to VGA adapter to do it instead. See Direct Video.
Is MiSTer hard to set up? Is it really only for technical people who like to tinker?
No and no, but those who enjoy tinkering can get a lot extra out of their MiSTer if they wish. The minimum setup only requires attaching a memory board to a DE-10 Nano and making an SD card. See the Setup Guide for more information.
Which cores require SDRAM?
You can find the updated list at the Console Cores and Computer Cores sections. Many Arcade cores require SDRAM as well.
Why does the some cores require an SDRAM add-on board when the other cores do not?
This is usually because the reliable timing for reads and writes to SDRAM are critical to make the core work properly without bugs. The original NES for instance needs to access the ROM directly, so the timings are much tighter so SDRAM is required. DDR3 has variable latency for random reads and random writes, so for systems where reliable timing is needed then DDR3 becomes unsuitable.
Does my MiSTer need cooling?
It is recommended to use a heatsink (passive cooling). 22mm x 22mm is the ideal size. 20mm x 20mm is more than enough however and is more common. Active cooling with a fan helps but is not strictly required. Some faster and more complex cores like ao486, SNES, N64, or PSX may generate a lot of heat.
What power supply is compatible with MiSTer?
The DE10-Nano board needs a 5V power supply with at least 2A. The connector is a coaxial "barrel" plug of 5.5 mm outer diameter and 2.1 mm inner diameter, center positive. If you are using a USB Hub addon board and have a lot of power hungry peripherals attached to it (wifi, bluetooth, multiple controllers, a mechanical hard drive), it might be a good idea to upgrade to a similar 5v power supply, but with more amps (4A-5A). Typically this is only needed if you have a mechanical hard drive, are heavily using the charging port, or have an MT32-Pi powered by the serial IO user port as these draw a good amount of amps.
My MiSTer needs a case. What should I do?
There are two routes you can take; either make it yourself or purchase a case from an online vendor. For DiY, you can find the necessary 3D print files online (e.g. thingiverse.
What kind of screws do I use with the DE-10 Nano's 14mm long brass standoffs?
M3 screws, 8mm is a good length.
How do I set up MiSTer for 1080p, shimmer free gameplay?
Run the updater script and use one of the video presets + filters that come with it in the Video Processing menu on the secondary OSD. See Video Configuration for more specific information.
How do I get the scanlines filters on my MiSTer to look good?
You will need to set the device to integer scaling for the best results without any shimmer artifacts during motion. Either set vscale_mode=1 in mister.ini or use the vscale integer settings within the core itself (as well as 5x) if they are supported. Not all cores support the OSD options to do integer scaling.
"Integer scaling" is when your source resolution (240p) is divided into your target resolution (1080p) using only whole numbers (e.g. 1, 2, 3, 4...). This means if you use integer scaling with the MiSTer set to a 1080p resolution in the MiSTer.ini, and the core you are using natively outputs 240p, then the image will be scaled 4x which 4 times 240 equals 960. This leaves a black border for the remaining 80 pixels distributed across the top and bottom the screen.
You can play with other settings if you want the scaler to fill the screen, but scanlines won't be "perfect" unless the source resolution (e.g. 240p) divides evenly into the target resolution (e.g. 1200p at 5x scaling).
I have a 4k or other higher than 1080p display, does MiSTer support that resolution? I'd like to enjoy better video scaling.
MiSTer can't quite reach 4k. Edit mister.ini on your SD card to change resolutions, e.g. video_mode=12 for 1920x1440p or video_mode=13 for 2048x1536p (hardware maximum). There is also video_mode=14 for 2560x1440p using the pixel repetition feature of your display, but this may have some tearing or resizing artifacts induced by your display's upscaling feature. Compatibility with these higher resolutions may depend upon your display and signal chain.
How does the accuracy level of various MiSTer cores compare to other FPGA options?
Most MiSTer cores are just as, if not more accurate, as any of the other major FPGA offerings available today. Most people would not able to tell the difference between these cores and the original hardware.
Will any MiSTer core ever get save states?
The Gameboy, GBA, Lynx, Wonderswan, NES, and PSX cores all support savestates.
Cores need to be written from scratch to support them or they need to be reworked significantly to support pause before save states can be added. At this time there are no specific plans to apply this to other cores, but it may happen one day. It is not as simple to add savestate functionality to an FPGA-based emulator than it is to add to a software-based emulator.
Why doesn’t this core from another repo work? Why is MiSTer so hard to use?
MiSTer repositories are self contained and the official updater script only fetches cores from the active official MiSTer repositories. Cores from other repos are not fully integrated so your results may vary. Some developers have their own discord servers or forums and you can seek support there.
Other cores work but I get a black screen for this one. What do I do?
Try setting vsync_adjust to 0 as your display may not support all refresh rates. (Note that this was the default setting)
My CD games don’t work! Help!
Unzip them. Do not zip CD games. Also put them in iso/wav/bin/img + cue format.
How do I handle multidisc games? The core keeps resetting when I change to another disc!
You need to place all discs into the same subfolder to do disc-swapping, like so:
./Valkyrie Profile (USA)/Valkyrie Profile (USA) (Disc 1).chd
./Valkyrie Profile (USA)/Valkyrie Profile (USA) (Disc 2).chd
If they are in the same folder then the core should not reset when you mount the next disc.
What version of the CD card bios do I need for TurboGrafx-16 CD/PC Engine CD?
Use Japanese version 3.0. You will commonly find it with filename: Super CD-ROM System (Japan) (v3.0).pce
How do I make MiSTer boot into the NES core and a specific game?
You need to use two different options: autobooting a core, and starting the core on a given ROM. Here is how:
- In the .INI file, set
bootcore=NES_20201102.rbf(or the specific core version you have), and comment out;bootcore_timeout. - Then on your NES games folder (e.g.
/media/fat/games/NES/, copy the FDS bios asboot0.rom, and your .NES rom to boot asboot1.rom.
For more options, please refer to the NES core documentation
I heard the DE10-Nano board uses subsidized components. Is MiSTer doomed if that stops?
De10-Nano is manufactured in very large scale for use by students and is widely available. When it reaches end of life, the open source cores and infrastructure will be ported to another widely available board.
I see a defect that some other people aren’t seeing. Should I get a different DE-10 Nano?
No, you should report the defect and wait for a fix. There is no magical best DE-10 Nano.
I found some other Cyclone based dev board on sale and it has built in WiFi. Can I use it for MiSTer?
Generally, no. While it’s always possible that someone will take time to port things to other boards, the different pins and memory will mean it won’t be a straight use and unless it’s a significant upgrade, it would never gain official support. The work involved to support another platform is quite heavy, so there is no plan to support multiple unofficial hardware platforms.
The DE-10 is rated for up to 100°C operation and it doesn’t get nearly that hot. Do I really need a fan or heatsink?
A number of complex cores (like ao486) benefit from having the chip at cooler temperatures, since heat can affect the tight timings they require. A heatsink is recommended to avoid any possible glitches, but you won't damage your DE10-Nano if you choose not to use one. A fan is even better on top of that.
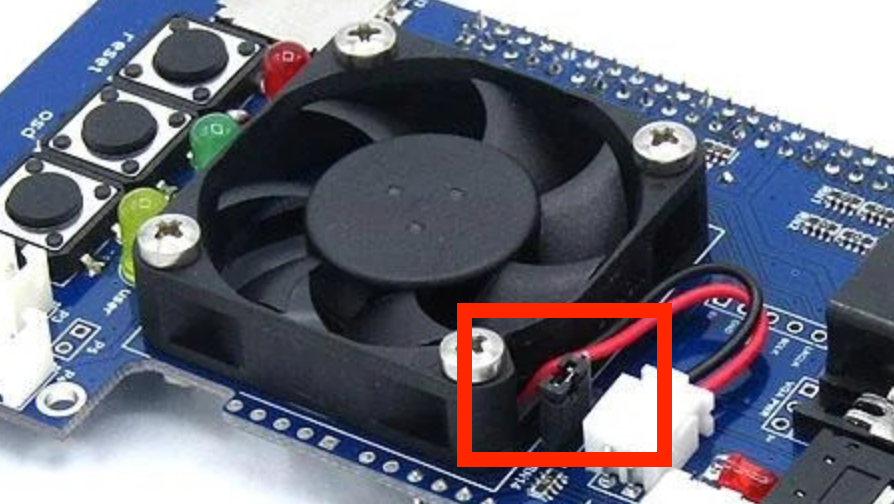
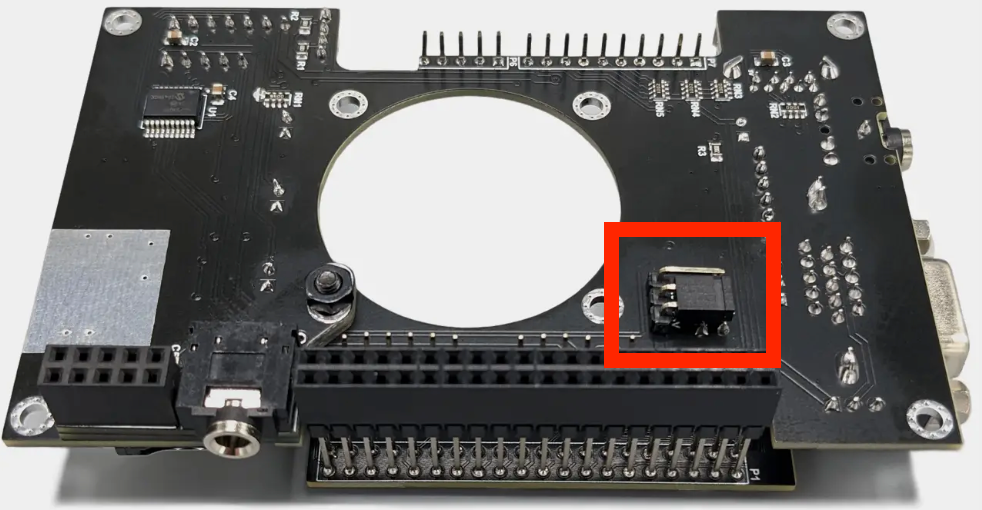
My fan is very loud, is there anything I can do about that?
Probably.
While not ubiquitous, a lot of IO boards will have a jumper next to or near the fan hookup to change the fan's voltage from 5v to 3v.
The jumper will likely either be next to the fan power's connector (you may have to remove the mezzanine board to access it), or on the underside of the board.
Here is an example of the jumper on the top side of the board.
Here is an example of the jumper on the underside of the board.
Changing the jumper's position in the block should slow the fan down (and make it quieter).
How do I change the wallpaper/background on the Menu core when I turn on my MiSTer?
By default the background of the Menu core when you turn on the MiSTer displays a simulation of old TV static. You can change the background type to color bars, plain black background, and a wallpaper by pressing F1 on the keyboard in the Menu core. The wallpaper option will check for menu.jpg or menu.png in the root of your MicroSD storage (or /media/fat/ when the MiSTer is running). If you don't have either of these files there then it will look in the ./wallpapers folder and randomly pick any .png or .jpg file inside each time the Menu core is loaded. Please note, EXIF metadata for rotation values will influence the orientation of the image. You can modify this value with online EXIF data editors available if you run into orientation issues.
Can you take screenshots on the MiSTer?
You can take screenshots on the MiSTer very easily. All you have to do is press Win+Print Screen on your keyboard and you will get an upscaled screenshot. For raw output from the core (which may be distorted or in a weird aspect ratio) prese Shift+Win+Print Screen. The screenshots are stored in ./screenshots in a folder named after the core you took the screenshot in.
These screenshots do not include the effects of any video processing options, they are very simple. To take screenshots of the full video processing (i.e. the image you see on your modern screen when using the MiSTer) you will need to use some kind of capture card that supports the desired resolution. An example capture card that is frequently used in the community is the Magewell USB HDMI Gen 1 or Gen 2 which can be found for a fraction of the retail price on eBay used.
Here is an example of a raw screenshot from the NES core
Here is an example of an upscaled screenshot from the Neo Geo core
Why use FPGA when other proven solutions exist, such as Raspberry Pi?
The following was originally written by Sorgelig, founder of MiSTer FPGA
There are debates about how to refer to the process of simulating real hardware using FPGA. Some people insist it's not emulation but rather true hardware replication, while any simulation using a traditional CPU should be referred to as emulation. I have my own opinion here. :) From my point of view, if the FPGA code is based on the circuitry of real hardware (along with the usual tweaks for FPGA compatibility), then it should be called replication. Anything else is emulation, since it uses different kinds of approximation to meet the same objectives. Currently, it's hard to find a core that can truly be called a replica – most cores are based on more-or-less functional recreations rather than true circuit recreation. The most widely used CPU cores – the Z80 (T80) and MC68000 (TG68K) – are pure functional emulations, not replications. So it's okay to call FPGA cores emulators, unless they are proven to be replicas.
To go back to the original question, then, why FPGA, if it's also just emulation? Well, FPGA emulation is fundamentally different than emulation on a CPU. Traditional emulators on CPUs execute code sequentially. This is a tricky method of emulation because real hardware has many chips and all of them work in parallel. The CPU, video chip/logic, audio chip, memory arbiter – all of them are working at the same time. So a traditional emulator has to take care of all these parts and try to emulate the whole orchestra at the same time by quickly "running" from one chip to another. This requires a lot of CPU power to emulate even an old and slow retro computer. Sometimes even a modern CPU working at 100 times the speed of the retro computer is not enough, so the emulator has to use approximation, skip emulation of some less important parts, or assume some standard work of the emulated system without extraordinary usage. Let's take a well-known emulator, UAE, emulating an Amiga. On a Raspberry Pi 3, you can run some Amiga CPU benchmarks and get crazy numbers like 100 times the original 68000 processor. So you may assume you have an emulated Amiga that is 100 times faster than real one. No, you don't. If you run different kinds of demos or games, you will see the video stutters sometimes. For example, if you play the well-known "State of The Art" demo by Spaceballs, you will notice video stuttering at some points, while a real Amiga 600 with 1x CPU speed plays the whole demo very smoothly. This is how traditional emulators on Raspberry Pi work.
FPGA emulation works very differently from traditional emulation on CPU. An FPGA is a large array of simple triggers and other logic – just like any other chip/CPU. The only difference is that specific chips/CPUs have these triggers and logic permanently connected, while FPGA allows you to connect them however you want. A special HDL (hardware description language) describes how to connect all these triggers/logic cells. Everything in FPGA works in parallel like in the original chips/devices. Thus, FPGA is pretty close to the original hardware. FPGA doesn't need high frequencies to emulate retro computers; it works at much lower frequencies than traditional emulators require. Since everything in FPGA works in parallel, it is no problem to handle any possible usage of the emulated system. Developers using FPGA usually concentrate on the specific part to make it work correctly – and it will work as it should in any possible scenario. In the same reference demo, "State Of the Art," using FPGA emulation, you can see smooth video through the whole playback, as on the original hardware.
You may want to ask, "So why not make all emulators on FPGA then?" The answer is: FPGA programming is not so trivial. Every bit in FPGA works in parallel, so the developer needs to think in parallel as well :). What is trivial on CPU is not trivial on FPGA – although some parts that are trivial on FPGA cost a lot in CPU code.